You can present an AutoRun Menu with buttons and graphics which you can customize by selecting graphics and
modifying other settings in AutoRun Architect. The menu will be displayed when the CD is inserted in the drive.
You can select a style from the the set of AutoRun Menu styles included with AutoRun Architect or you
can use your
own graphics.
You can also set other properties for the window such as titles, window name, logo and image.
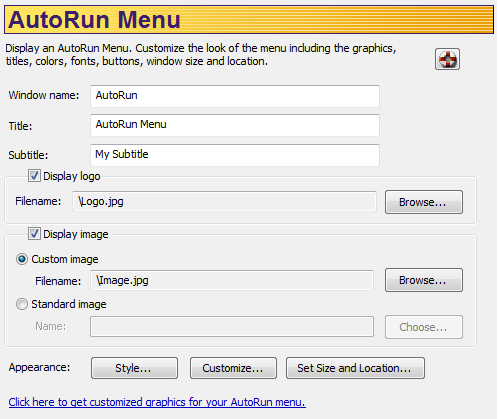
To display a Standard AutoRun Menu:
1. Enter a name in the Window name text box. This name will appear on the window
frame the task bar when the
AutoRun Menu window is open.
2. Enter a title in the Title text box. This title will appear in the top area
of the AutoRun Menu window.
3. Optionally enter a subtitle in the Subtitle text box. This subtitle will
appear under the the title in the top area of the
AutoRun Menu window.
4. To display a logo beside the AutoRun title in the AutoRun menu:
1. Check the Display logo check box.
2. Click Browse and choose the graphic file that you want to use.
·The graphic needs to be in either GIF (*.gif), JPEG (*.jpg) or Windows Bitmap Format (*.bmp).
·The graphic appears with the vertical center of the graphic aligned vertically to the center of the
menu title area.
·If the image is smaller then the area available the image will be drawn without being resized. If the
image is larger then the area available the image will be shrunk down in order to fit. The aspect ratio
will be preserved.
5. To display an image beside the buttons in the AutoRun menu. If there is no logo
then the menu title will be
centered in the window:
1. Check the Display image check box.
2. To use your own image on the menu:
1. Click on the Custom radio button.
2. Click Browse and choose the graphic file that you want to use. The graphic
can be in any one of
JPEG, GIF or BMP format. If the graphic is large then the space available then the graphic will
automatically be shrunk down. The aspect ratio will be preserved.
3. You can customize the sizing method used for the image by clicking on the Customize
button.
3. To use a standard AutoRun Architect image on the menu:
1. Click on the Standard radio button.
2. Click Choose.
3. A dialog displaying all the available standard images will appear.
4. Choose the image you want to use.
5. Click OK.
6. To change the appearance of the AutoRun Menu.
·Click on Standard to choose an appearance from the standard styles included with AutoRun Architect.
·Click on Customize to alter the standard appearance or to include your own custom graphics.
·Click on Size and Location to set the size and/or location for the AutoRun window:
To get graphics for the menu:
If you would like to get customized graphics for the menu for your company or project click on the link Click
here to
get a customized graphics for your AutoRun menu.
Advanced Options
In order to view the advanced options for customizing the menu you need to be in Advanced mode. See Working with
Modes (Standard/Advanced) for mode information on switching modes.
In
advanced mode you can also change the type of the AutoRun Menu to an HTML based AutoRun menu by clicking
on the Change to HTML Menu button. See Defining the HTML based AutoRun Menusfor
more information about
defining HTML based AutoRun menus.